
 [TẶNG BẠN] TRỌN BỘ Bí kíp học tốt 08 môn
Chắc suất Đại học top - Giữ chỗ ngay!!
ĐĂNG BÀI NGAY để cùng trao đổi với các thành viên siêu nhiệt tình & dễ thương trên diễn đàn.
[TẶNG BẠN] TRỌN BỘ Bí kíp học tốt 08 môn
Chắc suất Đại học top - Giữ chỗ ngay!!
ĐĂNG BÀI NGAY để cùng trao đổi với các thành viên siêu nhiệt tình & dễ thương trên diễn đàn.
The Epson SureColor SC-F9300 Series Adjustment Program is a specialized software utility designed for the maintenance, diagnostics, and repair of the Epson SureColor SC-F9300 series of printers. Unlike the standard drivers and software provided to end-users, this program is intended for use by authorized service technicians or experienced individuals with a strong technical background.
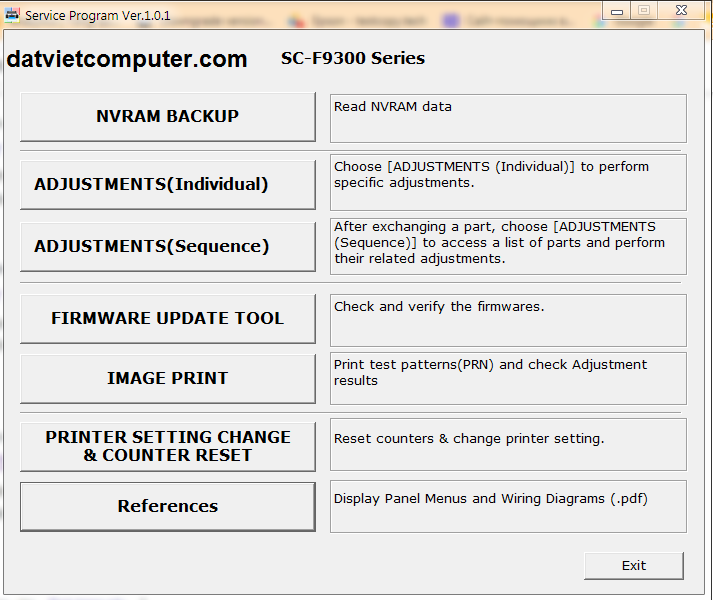
The “Adjustment Program” (also called “Service Program”, “Service Utility”, or “Service Mode Tool”) is a low-level software application intended for use by technicians and authorized service centers. It allows operators to access hidden maintenance menus, perform electronic resets (ink pad, waste counters, head alignment, etc.), test individual parts, and calibrate print hardware beyond what is exposed in the regular printer control panel.
Because the SC-F9300 series is a commercial/industrial printer, many of its advanced calibration routines and internal counters are restricted from the normal user interface. The Adjustment Program bridges that gap, enabling advanced maintenance and servicing operations.
It is worth noting that Epson does not publicly advertise or freely distribute these adjustment tools. They are generally reserved for authorized repair centers or are obtained (with caution) through aftermarket / third-party channels.
Download file link : Datvietcomputer.com
Here are some of the core capabilities commonly associated with the SC-F9300 adjustment / service software:
Printers often maintain internal counters for tasks such as head cleanings, capping station wear, and waste ink pad saturation. When these counters reach certain thresholds, the printer may refuse to print, display error messages, or require service mode intervention. The adjustment tool can reset these counters or reinitialize parts to allow continued operation.
Precise alignment of printheads is critical to avoid banding, misregistration, and uneven printing. The service utility can run alignment routines (sometimes with printed patterns) and allow manual input of fine adjustments to correct misalignment.
Dye sublimation printing demands extremely precise media feeding and tension. The tool enables fine-tuning of media feed ratios, adjustments to roller timing, and overlapping corrections — useful especially when printing on varying fabric weights or media thicknesses.
Technicians can individually test components such as motors, heaters, fans, sensors, and solenoids. This helps isolate hardware failures or mechanical issues without guessing. The software may also read sensor voltages or status registers to help with fault diagnosis.
Some versions of the utility allow writing or reprogramming firmware, dumping or modifying EEPROM settings, or restoring defaults. Such functions are powerful — and risky — if misused.
Common maintenance tasks — like nozzle cleaning, capping station wiping, flushing flush pumps, and cleaning cycles — can be invoked programmatically via the Adjustment Program, sometimes in sequences not available in normal mode.
For special media types or unusual printing conditions, the tool lets trained technicians adjust calibration curves, temperature offsets, heater levels, voltage offsets, and other tuning parameters.
While specific versions vary, a typical technician workflow using the SC-F9300 adjustment tool might look like:
Because the Adjustment Program often runs at a low level, any mistake (incorrect offsets, wrong settings, or miscalibrations) can render the printer unusable, require component replacement, or damage print quality.
You would typically resort to the SC-F9300 Adjustment Program under the following scenarios:
For many day-to-day users and operators, the regular control panel plus Epson’s standard software (such as Epson Edge Print, Epson Control Dashboard) is sufficient. The Adjustment Program is a specialized tool reserved for deeper intervention.
It’s helpful to distinguish the Adjustment Program from Epson’s publicly distributed management and printing software:
In practice, many technicians will use a combination: the official tools for regular operation and the Adjustment Program when deeper servicing is required.
While the Adjustment Program is extremely powerful, it carries significant risks:
Because of these risks, many organizations restrict use of the Adjustment Program to certified service personnel. If you do choose to use it, always:
To safely and effectively use the SC-F9300 Adjustment Program:
As an illustrative example, suppose your SC-F9300 shows “Waste Ink Pad Full – Service Required,” preventing any prints. The technician might:
After successful reset, normal printing should resume — though the maintenance history note or log may reflect that the pad should be replaced over time.
The Epson SureColor SC-F9300 Series Adjustment / Service Program is a critical but advanced utility designed for in-depth diagnostics, maintenance, calibration, and repair tasks that are unavailable via the standard operator interface. It empowers service technicians to reset internal counters, align hardware precisely, test individual components, and fine-tune printing performance. However, with that power comes responsibility: misuse can damage the printer, void warranties, or introduce errors.
For most users, Epson’s official tools like Epson Edge Print and Epson Control Dashboard are sufficient for regular operation and media configuration. But for service operations, hardware repair, or complex issues, the Adjustment Program becomes indispensable—provided it's used with care, proper backups, and controlled procedures.
support Whatsapp Link
Whatsapp : wa.me/84936161390
Website : datvietcomputer.com/
Facebook : m.me/datvietcompputer
Telegram t.me/datvietcomputer
What Is the SC-F9300 Adjustment / Service Program?
The “Adjustment Program” (also called “Service Program”, “Service Utility”, or “Service Mode Tool”) is a low-level software application intended for use by technicians and authorized service centers. It allows operators to access hidden maintenance menus, perform electronic resets (ink pad, waste counters, head alignment, etc.), test individual parts, and calibrate print hardware beyond what is exposed in the regular printer control panel.
Because the SC-F9300 series is a commercial/industrial printer, many of its advanced calibration routines and internal counters are restricted from the normal user interface. The Adjustment Program bridges that gap, enabling advanced maintenance and servicing operations.
It is worth noting that Epson does not publicly advertise or freely distribute these adjustment tools. They are generally reserved for authorized repair centers or are obtained (with caution) through aftermarket / third-party channels.
Download file link : Datvietcomputer.com
Key Functions and Features
Here are some of the core capabilities commonly associated with the SC-F9300 adjustment / service software:
1. Reset Counters & Waste Ink Pads
Printers often maintain internal counters for tasks such as head cleanings, capping station wear, and waste ink pad saturation. When these counters reach certain thresholds, the printer may refuse to print, display error messages, or require service mode intervention. The adjustment tool can reset these counters or reinitialize parts to allow continued operation.
2. Head Alignment & Nozzle Checks
Precise alignment of printheads is critical to avoid banding, misregistration, and uneven printing. The service utility can run alignment routines (sometimes with printed patterns) and allow manual input of fine adjustments to correct misalignment.
3. Feed / Media Adjustment
Dye sublimation printing demands extremely precise media feeding and tension. The tool enables fine-tuning of media feed ratios, adjustments to roller timing, and overlapping corrections — useful especially when printing on varying fabric weights or media thicknesses.
4. Part Tests & Diagnostics
Technicians can individually test components such as motors, heaters, fans, sensors, and solenoids. This helps isolate hardware failures or mechanical issues without guessing. The software may also read sensor voltages or status registers to help with fault diagnosis.
5. Firmware / EEPROM Operations
Some versions of the utility allow writing or reprogramming firmware, dumping or modifying EEPROM settings, or restoring defaults. Such functions are powerful — and risky — if misused.
6. Maintenance Routines
Common maintenance tasks — like nozzle cleaning, capping station wiping, flushing flush pumps, and cleaning cycles — can be invoked programmatically via the Adjustment Program, sometimes in sequences not available in normal mode.
7. Custom Calibration & Offset Tables
For special media types or unusual printing conditions, the tool lets trained technicians adjust calibration curves, temperature offsets, heater levels, voltage offsets, and other tuning parameters.
How It Works / Workflow
While specific versions vary, a typical technician workflow using the SC-F9300 adjustment tool might look like:
- Connection: The printer is connected via USB or network interface to a PC with the Adjustment Program installed.
- Entering Service Mode: The tool is used to instruct the printer to enter service mode (a special internal mode not normally accessible).
- Backup / Dump Settings: Often, the first step is to back up the printer’s current settings, EEPROM, or calibration tables.
- Test & Calibration: The technician runs various diagnostic tests (motors, sensors, heaters) and prints alignment/nozzle patterns.
- Input Corrections: Based on the test outputs, fine adjustments are entered (e.g. tiny offsets, feed corrections).
- Reset Counters / Clear Errors: The program resets internal error counters or flush pad full flags.
- Verification: After changes, test prints or patterns are run to verify correct function.
- Exit Service Mode / Restart: The printer is taken out of service mode and restarted for normal operation.
Because the Adjustment Program often runs at a low level, any mistake (incorrect offsets, wrong settings, or miscalibrations) can render the printer unusable, require component replacement, or damage print quality.
Use Cases & When You Need It
You would typically resort to the SC-F9300 Adjustment Program under the following scenarios:
- The printer is locked with a waste pad “full counter” error or “service required” refusal.
- Severe print defects arise (banding, misalignment, color shifts) that cannot be fixed via standard user maintenance tools.
- After hardware replacements (printhead, capping station, motors), alignment and counter resets are necessary.
- To do a full diagnostic check of internal components.
- In preventive maintenance to calibrate wear and drift over time.
For many day-to-day users and operators, the regular control panel plus Epson’s standard software (such as Epson Edge Print, Epson Control Dashboard) is sufficient. The Adjustment Program is a specialized tool reserved for deeper intervention.
Relationships with Epson’s Official Tools (Edge Print / Control Dashboard)
It’s helpful to distinguish the Adjustment Program from Epson’s publicly distributed management and printing software:
- Epson Edge Print is Epson's RIP software designed for their F-series textile printers, bundled for production workflows. It handles job management, colour control, step & repeat, nesting, and routing to multiple printers. Epson Press
- Epson Control Dashboard (sometimes called “Epson Edge Dashboard” or “Control Dashboard”) is a browser-based interface that allows media setup, registration of print media, downloading print setting files (EMX files), and synchronizing media settings between PC and printer. download.epson-europe.com+2support2.epson.net+2
- These official tools help operators configure media types, adjust common print parameters, and maintain workflows — but they do not provide the deep maintenance or service-level access available through the Adjustment Program.
In practice, many technicians will use a combination: the official tools for regular operation and the Adjustment Program when deeper servicing is required.
Risks, Legality, and Ethical Considerations
While the Adjustment Program is extremely powerful, it carries significant risks:
- Warranty Void / Unauthorized Access: Using an unofficial or unauthorized service tool may void warranty or violate licensing agreements.
- Bricking / Damage: Incorrect settings or calibration can damage hardware, misalign heads irreversibly, or require parts replacement.
- Counterfeit / Unsafe Downloads: Many versions floating online are modified, cracked, or malicious. Using them may expose your system to malware.
- Intellectual Property / Licensing: Epson does not publicly distribute these tools, and distributing them may infringe copyright or licensing terms.
Because of these risks, many organizations restrict use of the Adjustment Program to certified service personnel. If you do choose to use it, always:
- Back up all settings and EEPROM/firmware before making changes.
- Work in a controlled environment with test media.
- Document changes and be prepared to roll them back.
- Use only versions known to be safe and from trusted sources (or via Epson’s support if available).
Tips and Best Practices
To safely and effectively use the SC-F9300 Adjustment Program:
- Always backup first. Create dumps of EEPROM and calibration before changes.
- Work incrementally. Make small corrections, test, then adjust further — avoid big jumps.
- Use test patterns. Print alignment guides and diagnostics to confirm adjustments.
- Record your changes. Keep logs for future reference.
- Maintain stable environment. Temperature, humidity, and media tension all matter.
- Stay updated. Use stable, version-matched service tool versions compatible with your printer firmware revision.
- When in doubt, consult certified service. Some issues are better handled by trained Epson technicians.
Sample Scenario: Resetting Waste Pad Counter
As an illustrative example, suppose your SC-F9300 shows “Waste Ink Pad Full – Service Required,” preventing any prints. The technician might:
- Connect via USB and open the Adjustment Program.
- Enter Service Mode.
- Navigate to the “Waste Counter / Pad Reset” menu.
- Read the current counter value (e.g. 100 % threshold reached).
- Reset the counter (set to zero).
- Optionally reinitialize pad usage parameters.
- Exit service mode and restart the printer.
- Run a nozzle check and alignment to confirm proper function.
After successful reset, normal printing should resume — though the maintenance history note or log may reflect that the pad should be replaced over time.
Summary & Conclusion
The Epson SureColor SC-F9300 Series Adjustment / Service Program is a critical but advanced utility designed for in-depth diagnostics, maintenance, calibration, and repair tasks that are unavailable via the standard operator interface. It empowers service technicians to reset internal counters, align hardware precisely, test individual components, and fine-tune printing performance. However, with that power comes responsibility: misuse can damage the printer, void warranties, or introduce errors.
For most users, Epson’s official tools like Epson Edge Print and Epson Control Dashboard are sufficient for regular operation and media configuration. But for service operations, hardware repair, or complex issues, the Adjustment Program becomes indispensable—provided it's used with care, proper backups, and controlled procedures.
support Whatsapp Link
Whatsapp : wa.me/84936161390
Website : datvietcomputer.com/
Facebook : m.me/datvietcompputer
Telegram t.me/datvietcomputer